데이터바인딩은 우리의 일상을 편하게 해주었다. 그러면 어떤 것을 편하게 해주었는지 먼저 살펴보고 시작해보자.
데이터바인딩을 사용하면 findViewById()를 호출하지 않아도 자동으로 xml에 만든 View들을 만들어준다.
RecyclerView에 각각의 item을 set해주는 작업도 xml에서 다 써주면 알아서 값이 들어간다.
값이 바뀌면 알아서 바뀐 값으로 View를 변경하게 할 수도 있고 기타 등등 유용하게 활용 할만한게 많다.
서론
새로운 화면을 추가해야 한다. 그러면 안드로이드 스튜디오를 켜고 xml을 만들고 레이아웃 화면을 구성해야 한다.
다음과 같이 TextView 5개와 Button 1개, RecyclerView 1개가 있는 View를 만들어 보도록 하겠다.
1
2
3
4
5
6
7
8
9
10
11
12
13
14
15
16
17
18
19
20
21
22
23
24
25
26
27
28
29
30
31
32
33
34
35
36
37
38
39
40
41
42
43
44
45
46
47
48
<?xml version="1.0" encoding="utf-8" ?> <LinearLayout xmlns:android="http://schemas.android.com/apk/res/android" android:layout_width="match_parent" android:layout_height="match_parent" android:orientation="vertical" > <LinearLayout android:layout_width="match_parent" android:layout_height="wrap_content" android:orientation="horizontal" > <TextView android:id="@+id/tvText1" android:layout_width="wrap_content" android:layout_height="wrap_content" /> <TextView android:id="@+id/tvText2" android:layout_width="wrap_content" android:layout_height="wrap_content" /> <TextView android:id="@+id/tvText3" android:layout_width="wrap_content" android:layout_height="wrap_content" /> <TextView android:id="@+id/tvText4" android:layout_width="wrap_content" android:layout_height="wrap_content" /> <TextView android:id="@+id/tvText5" android:layout_width="wrap_content" android:layout_height="wrap_content" /> <Button android:id="@+id/btnSample" android:layout_width="match_parent" android:layout_height="wrap_content" android:text="button" /> </LinearLayout> <android.support.v7.widget.RecyclerView android:id="@+id/rcContent" android:layout_width="match_parent" android:layout_height="wrap_content" /> </LinearLayout>
xml을 만들었으니 Activity에서 View를 이어주는 작업을 해야한다. 아래와 같은 작업을 할 수 있다.
1
2
3
4
5
6
7
8
9
10
11
12
13
14
15
16
17
18
19
20
21
TextView tvText1; TextView tvText2; TextView tvText3; TextView tvText4; TextView tvText5; Button btnSample; RecyclerView rcContent; @Override protected void onCreate (@Nullable Bundle savedInstanceState) super .onCreate(savedInstanceState);setContentView(R.layout.basic_activity); tvText1 = (TextView) findViewById(R.id.tvText1); tvText2 = (TextView) findViewById(R.id.tvText2); tvText3 = (TextView) findViewById(R.id.tvText3); tvText4 = (TextView) findViewById(R.id.tvText4); tvText5 = (TextView) findViewById(R.id.tvText5); btnSample = (Button) findViewById(R.id.btnSample); rcContent = (RecyclerView) findViewById(R.id.rcContent);
위의 작업을 할 경우 우리는 제일 먼저 findViewById() 노가다를 진행한다. 지금 만들려는 레이아웃은 몇 개 안되는 뷰이지만 만약 10개, 100개 그리고 그 이상이라면 그만큼 노가다 코드를 작성하게 될 것이다.
그래서 이러한 노가다 코드를 줄일 수 있도록 도와주는 라이브러리인 버터 나이프 가 있다. 자바에서는 버터 나이프를 이용해서 노가다 코드를 줄일 수 있었고, 코틀린에서는 Kotlin-extensions를 이용해서 findViewById를 하지 않아도 xml의 id를 바로 객체화시켜서 Activity에서 사용할 수 있었다.
아래는 버터 나이프를 이용한 축약된 형태의 코드 모습이다.
1
2
3
4
5
6
7
8
9
10
11
12
13
14
15
16
17
18
19
20
21
22
@BindView (R.id.tvText1)TextView tvText1; @BindView (R.id.tvText2)TextView tvText2; @BindView (R.id.tvText3)TextView tvText3; @BindView (R.id.tvText4)TextView tvText4; @BindView (R.id.tvText5)TextView tvText5; @BindView (R.id.btnSample)Button btnSample; @BindView (R.id.rcContent)RecyclerView rcContent; @Override protected void onCreate (@Nullable Bundle savedInstanceState) super .onCreate(savedInstanceState);setContentView(R.layout.butterknife_activity); ButterKnife.bind(this );
하지만 데이터바인딩 을 사용한다면 어떻게 될까???
위의 화면은 오류가 아니다. 따로 View를 정의하고 우리가 이어줄 필요가 없다는 것이다. Databinding 을 사용한다면 우리는 아무 소스코드를 적지 않아소 Databinding이 알아서 다 해준다.
최소사항
Android 2.1(API 7) 이상
Android Plugin for Gradle 1.5.0-alpha 1 이상
Android Studio 1.3 이상
아주 아주 아주 옛날의 환경으로 작업하고 있지 않는 이상 지금 쓰는 환경에서 무리 없이 바로 사용할 수 있다.
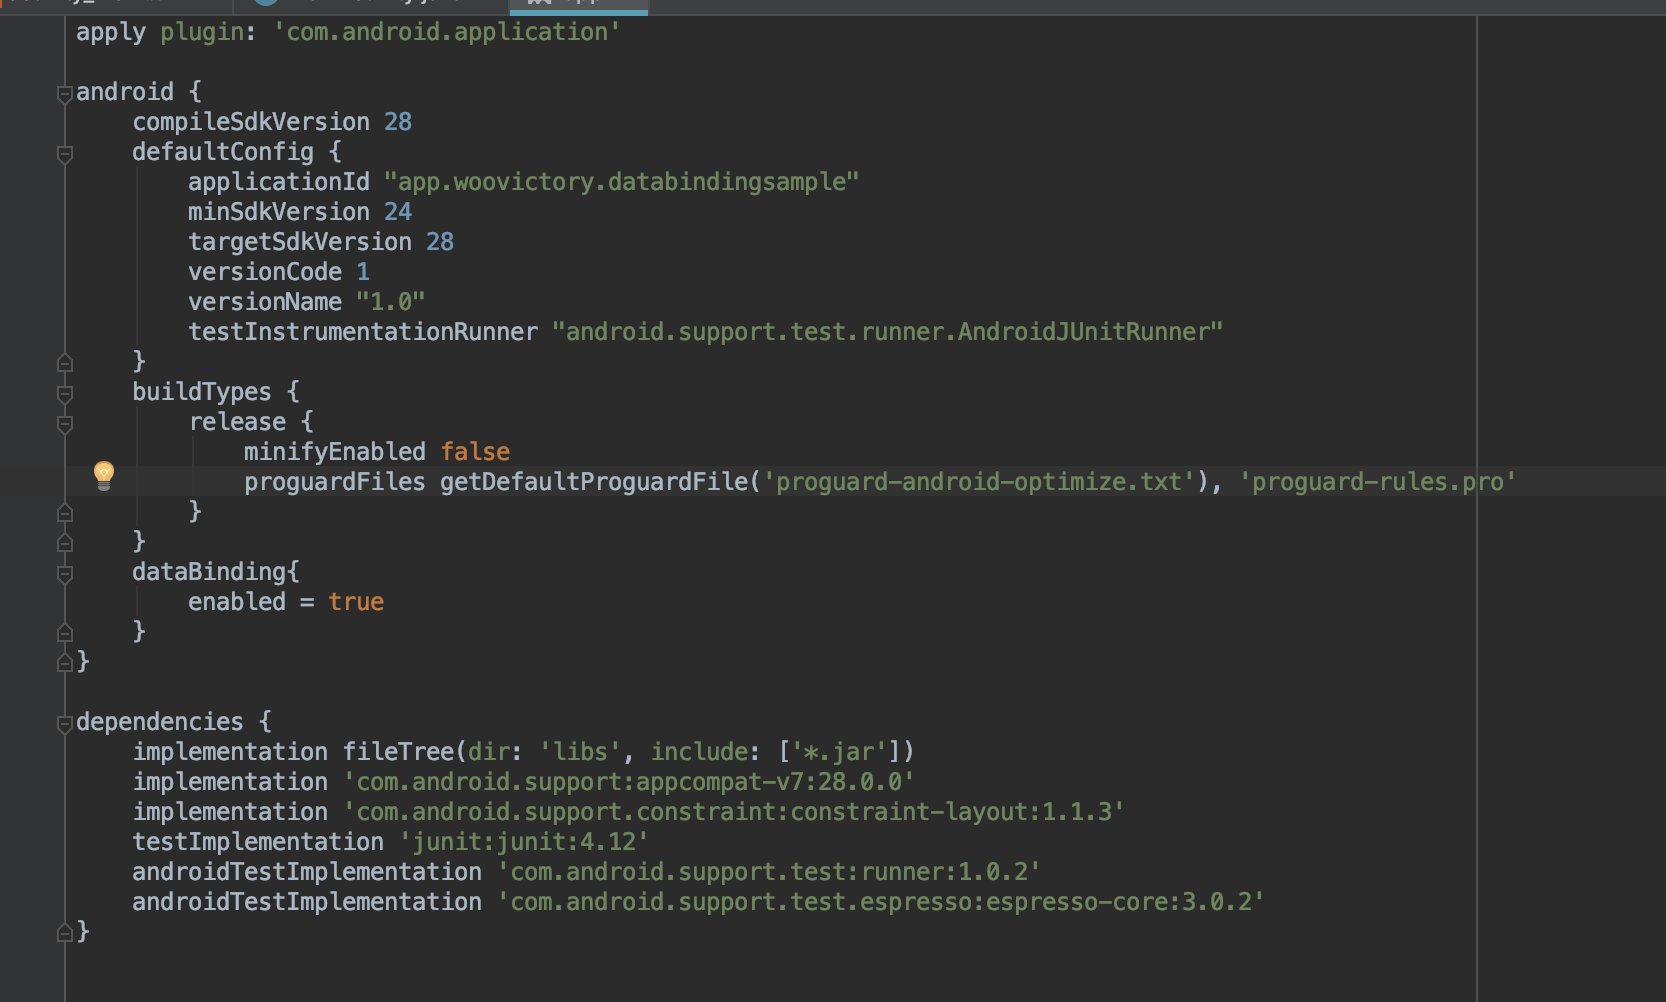
설정
build.gradle(Module:app) 에서 위와 같이 enabled만 true로 설정해주면 끝난다.
xml
Databinding을 사용하기 위해서는 xml의 최상위에 태그를 감싸준다.
1 2 3 4 5 6 7 8 9 10 11 12 13 14 15 16 17 18 19 20 21 22 23 24 25 26 27 28 29 30 <?xml version="1.0" encoding="utf-8" ?> <layout xmlns:android="http://schemas.android.com/apk/res/android" xmlns:app="http://schemas.android.com/apk/res-auto" xmlns:tools="http://schemas.android.com/tools" > <data> <variable name="activity" type="app.woovictory.databindingsample.MainActivity" /> </data> <android.support.constraint.ConstraintLayout android:layout_width="match_parent" android:layout_height="match_parent" tools:context=".MainActivity" > <TextView android:layout_width="wrap_content" android:layout_height="wrap_content" android:text="Hello World!" app:layout_constraintBottom_toBottomOf="parent" app:layout_constraintLeft_toLeftOf="parent" app:layout_constraintRight_toRightOf="parent" app:layout_constraintTop_toTopOf="parent" /> </android.support.constraint.ConstraintLayout> </layout>
Java
Activity에서 항상 해주던 setContentView() 대신에 **DatabindingUtil.setContentView()**를 이용해서 layout xml을 이어준다.
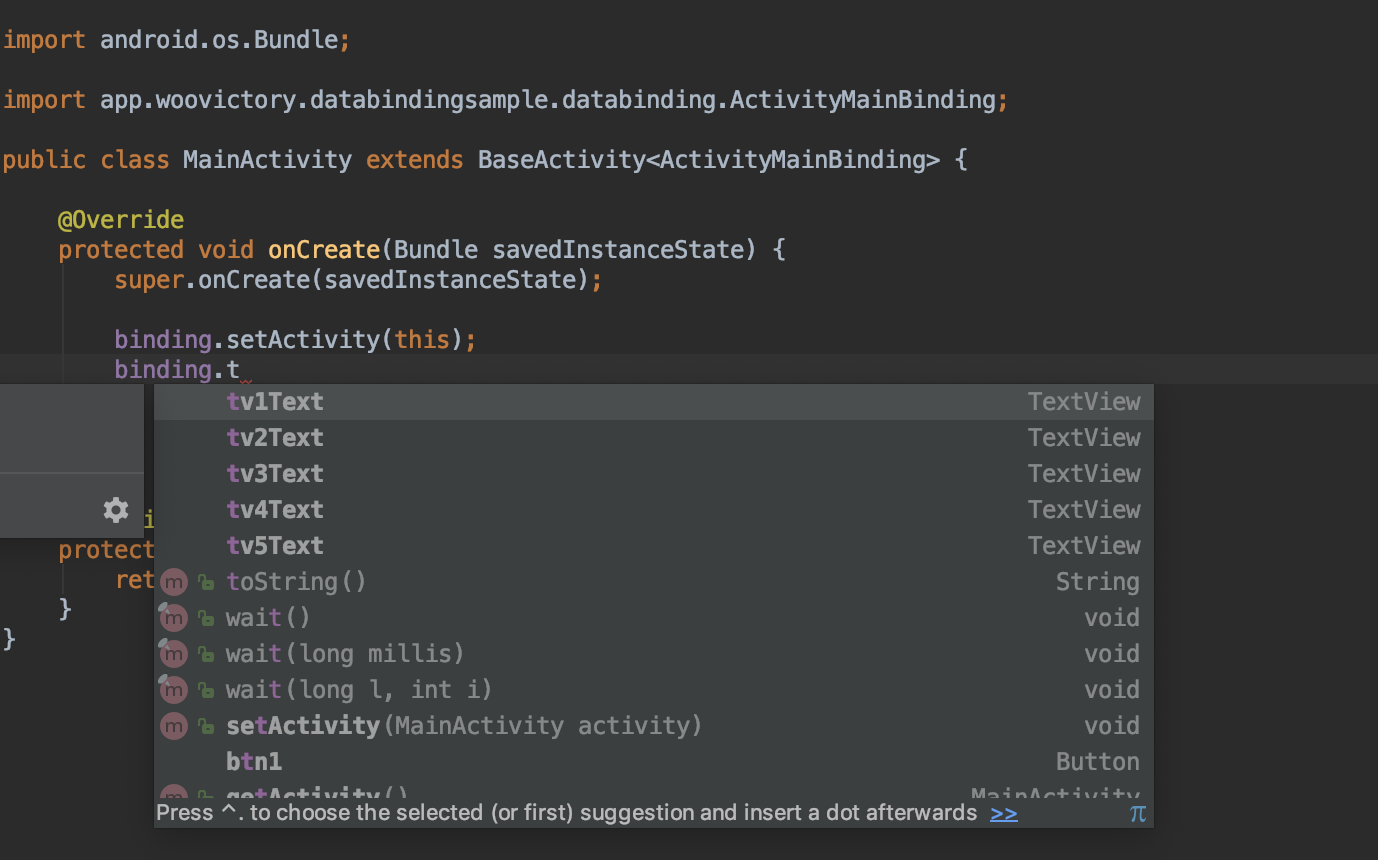
1 2 3 4 5 6 7 8 ActivityMainBinding binding; @Override protected void onCreate (@Nullable Bundle savedInstanceState) super .onCreate(savedInstanceState);binding = DataBindingUtil.setContentView(this , R.layout.databinding_activity); binding.setActivity(this );
xml의 파일 이름을 기준으로 ~~~Binding 클래스가 새로 생성된다.
여기서는 xml의 이름이 activity_main.xml이기 때문에 ActivityMainBinding 클래스가 새로 생성되었다.
Binding 클래스 이름의 생성은 파스칼 표기법 기준으로 변경된다.
예를 들어, woo_activity.xml -> WooActivityBinding 클래스를 생성시킨다.
그리고 xml에서 layout 태그 안에 binding.setActivity(this)처럼 Activity와 xml을 이어줄 수 있다.
View를 사용하고자 할 때는 binding 변수에서 아래와 같이 사용할 수 있다.
View의 이름은 카멜표기법 기준으로 변경된다.
@+id/tv1_text 의 뷰는 tv1Text으로 이름이 변경되어 사용할 수 있다.
Click Event
사용자가 어떤 버튼을 클릭하면 아래의 함수를 실행하도록 하려고 한다.
1 2 3 public void onButtonClick (View view) Toast.makeText(this , "Button Click" , Toast.LENGTH_SHORT).show(); }
기본
버튼에 setOnClickListener()를 달아서 클릭이벤트를 받아주도록 할 것이다.
1 2 3 4 5 6 7 btnSample.setOnClickListener(new View.OnClickListener() { @Override public void onClick (View view) onButtonClick(view); } });
위에 주석 처리된 것처럼 setOnClickListener(this)를 했다면 implements View.OnClickListener를 하고 함수를 오버라이드 하고 그 안에서 onButtonClick() 함수를 호출했을 것이다.
버터나이프
버터나이프에서는 @OnClick(R.id.xxx )만 함수에 넣어주면 된다.
1 2 3 4 @OnClick (R.id.btnSample)public void onButtonClick (View view) Toast.makeText(this , "Button Click" , Toast.LENGTH_SHORT).show(); }
버터 나이프는 아주 간단하게 이벤트를 처리할 수 있다.
데이터바인딩
데이터바인딩은 xml에서 클릭되면 실행하고자 하는 함수를 지정해준다.
1 2 3 4 5 <Button android:id="@+id/btn2" android:onClick="@{activity.onButtonClick2}" android:layout_width="wrap_content" android:layout_height="wrap_content" />
위에서는 android:onClick 에서 activity라는 곳에 있는 onButtonClick2() 함수를 실행하도록 설정해두었다.
여기서 activity라는 것은 xml에서 선언해 둔 변수를 가리킨다.
1 2 3 4 5 6 7 8 9 10 11 <layout xmlns:android="http://schemas.android.com/apk/res/android" xmlns:app="http://schemas.android.com/apk/res-auto" xmlns:tools="http://schemas.android.com/tools" > <data> <variable name="activity" type="app.woovictory.databindingsample.MainActivity" /> </data>
xml에서 태그를 이용해서 그 안에서 각각 사용하고자 하는 변수를 태그를 이용해서 정의해주면 사용할 수 있다.
1 2 3 4 5 6 7 8 9 10 11 12 13 14 public class MainActivity extends BaseActivity <ActivityMainBinding > @Override public void onCreate (Bundle savedInstanceState) super .onCreate(savedInstanceState); binding.setActivity(MainActivity.this ); } public void onButtonClick2 (View view) Toast.makeText(this , "Click222" ,Toast.LENGTH_LONG).show(); } }
위의 예제는 데이터바인딩을 수행하는 부분을 BaseActivity로 빼두어서 설정하는 코드가 보이지 않는다. 하지만, 바인딩 하는 부분이 수행된다.
Java 파일에서는 이 변수가 어떤 값을 넣어줄건지 지정해주어야 한다.
setActivity() 함수는 자동으로 생성된 함수이다. 우리가 xml에서 activity라는 변수를 만들었다면 자동으로 setActivity()가 생성되어서 binding.setActivity(this) 처럼 사용할 수 있는 것이다.
setActivity(this)가 xml에서의 activity라는 변수를 이 Class로 지정하겠다는 의미인 것이다. 즉, xml의 activity 변수는 MainActivity Class와 연결되고 MainActivity의 변수 혹은 함수를 참조할 수 있음을 의미한다.
MVP 패턴을 사용한다면 presenter를, MVVM 패턴을 사용한다면 ViewModel을 활용해서 클릭 이벤트에 맞는 동작을 수행하도록 지정하면 된다. 이에 대한 나의 생각은 조금 다르다. MVP 패턴은 View에서 발생한 이벤트를 Presenter에게 위임하여 View는 단순히 View 그 자체를 그리는 것에만 초점을 맞추어 관심사를 분리한 것으로 볼 수 있다. View에서 발생한 이벤트 혹은 요청한 이벤트가 데이터를 불러오거나 가공하는 로직이 포함된다면 Presenter에게 위임하여 처리하는 것이 맞다고 생각을 한다.
그리고 View에서 발생한 이벤트가 단순히 화면 전환과 같은 이벤트라면 View에서 처리해도 마땅하다고 생각을 한다.
함수 이름을 지정할 때 기존에는 @{activity.함수이름()}으로 해도 문제가 없었지만 언젠가부터 이 방법은 deprecated 되었다고 나온다고 한다. 그래서 @{activity::함수이름()}으로 사용하도록 구글 문서에서 안내하고 있다.
RecyclerView 리스트
그렇다면 이제 RecyclerView를 이용해서 리스트 목록을 만드는 작업을 해보려고 한다. 기본적으로 1:1 카카오톡의 채팅방과 같이 사용자의 사진, 이름, 그리고 여기서는 나이로 구성되어 있는 화면을 만들어보겠다. 먼저, item을 구성하는 xml을 정의해야 한다.
1 2 3 4 5 6 7 8 9 10 11 12 13 14 15 16 17 18 19 20 21 22 23 24 25 26 27 28 29 30 31 <?xml version="1.0" encoding="utf-8"?> <LinearLayout xmlns:android ="http://schemas.android.com/apk/res/android" android:layout_width ="match_parent" android:layout_height ="wrap_content" android:gravity ="center_vertical" android:orientation ="horizontal" android:padding ="8dp" > <de.hdodenhof.circleimageview.CircleImageView android:id ="@+id/ivProfile" android:layout_width ="40dp" android:layout_height ="40dp" /> <LinearLayout android:layout_width ="match_parent" android:layout_height ="wrap_content" android:layout_marginLeft ="8dp" android:orientation ="vertical" > <TextView android:id ="@+id/tvName" android:layout_width ="wrap_content" android:layout_height ="wrap_content" /> <TextView android:id ="@+id/tvAge" android:layout_width ="wrap_content" android:layout_height ="wrap_content" android:layout_marginTop ="8dp" /> </LinearLayout > </LinearLayout >
또한, 리스트에서 쓰일 사용자 User 클래스도 생성해준다.
1 2 3 4 5 6 7 8 9 10 11 12 13 14 15 16 17 18 19 20 21 22 23 24 25 26 package app.woovictory.databindingsample;public class User String name; int age; String imageUrl; public User (String name, int age, String imageUrl) this .name = name; this .age = age; this .imageUrl = imageUrl; } public String getName () return name; } public int getAge () return age; } public String getImageUrl () return imageUrl; } }
실제로는 서버에서 사용자의 목록을 받아오겠지만 여기서는 샘플 데이터를 이용해서 활용할 수 있도록 구성한다.
ViewHolder
각각의 item view를 보여주기 위해서 ViewHolder에서 View를 만들어주는 작업을 한다.
기본
1 2 3 4 5 6 7 8 9 10 11 12 13 public class UserViewHolder extends RecyclerView .ViewHolder TextView tvName; TextView tvAge; ImageView ivProfile; public UserViewHolder (View itemView) super (itemView); tvName = (TextView) itemView.findViewById(R.id.tvName); tvAge = (TextView) itemView.findViewById(R.id.tvAge); ivProfile = (ImageView) itemView.findViewById(R.id.ivProfile); } }
버터나이프
1 2 3 4 5 6 7 8 9 10 11 12 13 14 15 public class UserViewHolder extends RecyclerView .ViewHolder @BindView (R.id.tvName) TextView tvName; @BindView (R.id.tvAge) TextView tvAge; @BindView (R.id.ivProfile) ImageView ivProfile; public UserViewHolder (View itemView) super (itemView); ButterKnife.bind(this ,itemView); } }
데이터바인딩
1 2 3 4 5 6 7 8 9 public class UserViewHolder extends RecyclerView .ViewHolder DatabindingItemBinding binding; public UserViewHolder (View itemView) super (itemView); binding = DataBindingUtil.bind(itemView); } }
위에서 순서대로 기본 -> 버터 나이프 -> 데이터바인딩을 차례대로 살펴보면 코드의 길이가 짧아지는 것을 확인할 수 있다. 그렇다. 데이터바인딩을 사용하면 개발자가 작성해야 할 코드의 양이 줄어든다!!
item 세팅
onBindView() 함수에서 각각의 position에 맞는 User 클래스의 내용에 따라 뷰의 내용을 넣어주는 작업을 해준다.
기본/버터나이프
1 2 3 4 5 6 7 8 9 10 11 12 13 14 public void onBindView (UserViewHolder holder, int position) User user = getItem(position); String name = user.getName(); holder.tvName.setText(name); int age = user.getAge(); holder.tvAge.setText(Integer.toString(age)); String imgUrl=user.getImgUrl(); ImageUtil.loadImage(holder.ivProfile,imgUrl, ContextCompat.getDrawable(getContext(),R.drawable.no_pic)); }
데이터바인딩
1 2 3 4 5 6 public void onBindView (UserViewHolder holder, int position) User user = getItem(position); holder.binding.setUser(user); }
원래는 기본이나 혹은 버터나이프에서는 각각의 holder의 view에 사용자 정보를 넣어주는 작업을 해주었지만 데이터바인딩에서는 그럴 필요가 없다.
setUser() 라는 함수를 보고 유추해 볼 수 있다. item_user.xml에서 user라는 변수를 만들어주었고, 그 변수에 setUser()라는 데이터바인딩에 의해서 생성된 함수를 통해서 position에 따른 user 객체를 할당해준다는 것을 알 수 있다.
1 2 3 4 5 6 7 8 <layout > <data > <variable name ="user" type ="app.woovictory.databindingsample.User" /> </data >
onBindView()에서 값을 넣어주는 대신에 setUser()를 통해서 User 객체를 user 변수에 할당해준다. 그리고 데이터바인딩을 통해서 xml에서 값을 넣어준다.
1 2 3 4 5 6 7 8 9 10 11 12 <TextView android:id ="@+id/tvName" android:text ="@{user.name}" android:layout_width ="wrap_content" android:layout_height ="wrap_content" /> <TextView android:id ="@+id/tvAge" android:text ="@{Interger.toString(user.age)}" android:layout_width ="wrap_content" android:layout_height ="wrap_content" android:layout_marginTop ="8dp" />
android:text에 @{user.필드이름}을 넣어주는 것만으로 user의 정보를 가져와서 다시 TextView에 넣어주는 작업을 해 줄 필요가 없는 것이다.
@BindingAdapter
그런데 여기서 드는 의문이 하나 있다. User 정보 중에 imageUrl이라는 필드는 “http://~~~.png ” 처럼 이미지가 저장되어 있는 주소 값으로 되어 있다. 이 값을 TextView에 넣는다면 이미지 url만 출력되는 원하지 않는 결과를 볼 것이다.
이럴 때 BindingAdapter를 사용하면 해결할 수 있다. 어노테이션으로 @BindingAdapter와 같이 정의해준다. 나는 이미지를 Setting하기 위해서 다음과 같이 정의한다.
1
2
3
4
@BindingAdapter ("app:imageUrl" )public static void loadImage (ImageView imageView, String url) ImageUtil.loadImage(imageView, url); }
그러면 UserAdapter에서 onBindView() 함수가 binding.setUser(user)를 호출하면서 데이터바인딩 작업이 수행된다. 그리고 xml에서 정의한 다음의 문장을 수행하게 된다.
1 2 3 4 5 <de.hdodenhof.circleimageview.CircleImageView android:id ="@+id/ivProfile" android:layout_width ="40dp" app:imageUrl ="@{user.imageUrl}" android:layout_height ="40dp" />
그러면 xml에서 @BindingAdapter로 정의된 부분을 찾아서 해당 View의 id와 @{user.imageUrl} 을 가지고 @BindingAdapter가 정의된 함수의 파리미터로 값을 전달하게 된다.
loadImage 함수를 호출하면서 파라미터로 id와 user.imageUrl에 담긴 url 값을 넘긴다.
+@BindinAdapter와 @BindinConversion은 유용하게 사용할 수 있다. 이와 관련된 내용은 추후 구글 공식 문서를 통해서 내용을 추가할 예정이다.
참고